Crochet Rotary Telephone Pattern
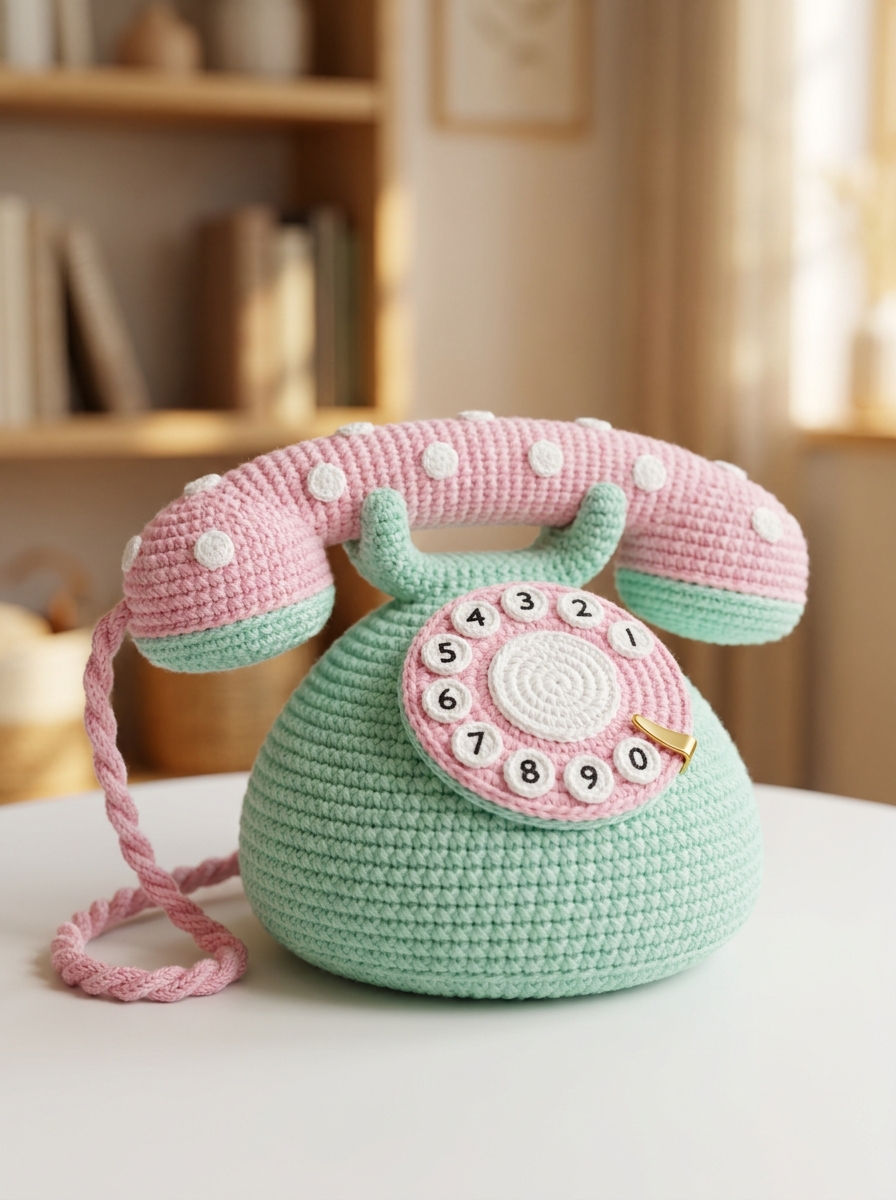
The image shows a vintage rotary telephone made entirely from crochet (amigurumi) in pastel pink and mint colors. This is an intermediate-to-advanced project that combines shaping, appliqué work, and stuffed crochet construction.
Materials Needed
Yarn
Mint Green
Baby Pink
White
Black (for numbers)
Small amount of Beige or Gold (dial pointer)
Supplies
2.5–3.5 mm crochet hook
Polyester fiberfill
Cardboard or plastic canvas (for support)
Yarn needle
Stitch markers
Fabric glue (optional)
Felt sheets for numbers (optional)
Part 1: Telephone Base
The base is a large dome shape.
Round 1
Magic Ring, 6 SC
Round 2
Increase around (12)
Round 3
(SC, INC) × 6 (18)
Round 4
(2 SC, INC) × 6 (24)
Continue increasing evenly until the base reaches the desired width.
Body
Work several rounds without increasing.
Gradually decrease near the top to create a rounded vintage telephone shape.
Stuff firmly as you go.
Part 2: Handset Supports
Make 2.
Pattern
Round 1:
Magic Ring, 6 SC
Round 2:
Increase to 12
Rounds 3–15:
SC around
Stuff lightly.
Sew onto the top of the base.
Part 3: Telephone Handset
Center Handle
Using pink yarn:
Chain approximately 40–50
Work rows of SC
Fold and sew into a tube
Stuff lightly
Earpiece and Mouthpiece Ends
Make two identical rounded pieces.
Round 1:
Magic Ring, 6 SC
Round 2:
Increase around (12)
Round 3:
(SC, INC) around (18)
Continue increasing until the desired size.
Attach to each end of the handset.
Add mint-colored lower sections.
Stuff firmly.
Part 4: Rotary Dial
Outer Ring
Using pink yarn:
Round 1:
Magic Ring, 6 SC
Continue increasing until a flat circle is formed.
Inner Dial
Create a smaller white circle.
Attach to the center.
Part 5: Number Buttons
Make 10 small circles.
For each circle:
Round 1:
Magic Ring, 6 SC
Round 2:
Increase around (12)
Fasten off.
Attach evenly around the dial.
Add embroidered or felt numbers:
1, 2, 3, 4, 5, 6, 7, 8, 9, 0
Part 6: Dial Pointer
Using beige or gold yarn:
Chain 8–10
Work 1 row of SC
Shape into a small triangle
Sew beside the dial.
Part 7: Telephone Cord
Spiral Cord
Using pink yarn:
Chain 80–120.
Work 3 SC into every chain stitch.
The strip will naturally curl.
Attach one end to the handset and the other to the base.
Part 8: Decorative Dots
The white polka dots on the handset are small crochet circles.
Mini Circle
Round 1:
Magic Ring, 6 SC
Fasten off and sew onto the handset.
Make 8–12 circles.
Assembly
Stuff all pieces firmly.
Insert cardboard or plastic canvas into the base if extra stability is needed.
Attach handset supports.
Sew on the handset.
Add the rotary dial and numbers.
Connect the spiral cord.
Handmade crochet vintage rotary telephone, pastel pink and mint green colors, amigurumi style, soft stuffed yarn texture, rotary dial with numbered buttons, curled crochet phone cord, cute retro aesthetic, highly detailed craftsmanship, cozy home decor, professional craft photography, soft natural lighting, shallow depth of field, ultra realistic, 8K, whimsical handmade art.
